With Relevance AI’s Microsoft Teams integration, you can connect your Teams workspace to your AI agents, enabling two-way conversations in real-time. Users can interact with AI agents directly in Teams — through channels, group chats, or direct messages — without leaving the platform. Agents monitor messages, respond in real-time, and automate communication workflows across your organization. The integration uses native OAuth-based tool steps that call Microsoft Graph API directly, giving you faster execution, more reliable performance, and tighter security compared to third-party relay approaches. Relevance AI uses a unified Microsoft authentication that works across Teams, Outlook, SharePoint, and OneDrive — connecting one account gives you access to all services.Documentation Index
Fetch the complete documentation index at: https://relevanceai-docs-merge-teams.mintlify.app/llms.txt
Use this file to discover all available pages before exploring further.
Prerequisites
Before setting up the Microsoft Teams integration, ensure you have:Relevance AI account
Microsoft Teams access
Sufficient permissions
A Teams channel, chat, or DM
Step 1: Connect the integration
- Go to Integrations & API Keys in the sidebar of your Relevance AI dashboard.
- Click Microsoft (Teams, Outlook, SharePoint, OneDrive) and then click Add Integration.
- In the pop-up window, sign into your Microsoft account and approve the requested permissions.
- Once complete, you’ll see a green Connected status indicator in Relevance AI.
Step 2: Install the Relevance AI app in Microsoft Teams
After connecting your Microsoft account, install the Relevance AI Bot App from the Microsoft marketplace so your agents can interact with channels, group chats, and direct messages.Search and install
Add the app to channels, group chats, or direct messages
- Channels
- Group chats
- Direct messages (DMs)
- Navigate to the channel where you want your agent to work
- Click the + icon at the top of the channel to add a tab or app
- Search for Relevance AI in the app picker
- Select the app and click Save
Set up Microsoft Teams as a trigger
You can configure your agents to automatically respond to Teams messages by setting up a trigger. When a message is received, your agent processes it and replies in real-time — creating a two-way conversation between the user and your AI agent directly within Teams. Triggers work across channels, group chats, and direct messages with the bot. Important: Teams triggers activate only on new messages. They do not trigger on new chat creation, group creation, or webhooks.- Navigate to your agent in Relevance AI and go to the Triggers section.
- Click Add Trigger and select Microsoft Teams from the list.
- Choose the Microsoft account you connected, then select the Team and specific channel, group chat, or direct message you want to monitor.
- Optionally, set up keyword matching to filter which messages activate your agent. Leave the keyword field empty to trigger on all messages, or enter specific keywords separated by commas.
- In the Core Instructions section, write a prompt that guides how your agent should respond — including its role, tone, and when to respond.
Attachment support
Agents connected via Microsoft Teams can receive and process attachments sent in channels and chats.Supported attachment types
Inline images
File uploads
Messages with only attachments
If a user sends a message that contains attachments but no text, the agent receives a[N attachments] indicator (e.g., [1 attachments]) in place of the message body. The agent can use this signal to recognize that attachments were sent and respond accordingly.
Agent Notifications
Setting up Teams notifications
- Navigate to your agent and click the Build tab
- In the left sidebar, click Escalations
- Under “Agent Notifications”, click Add agent notification
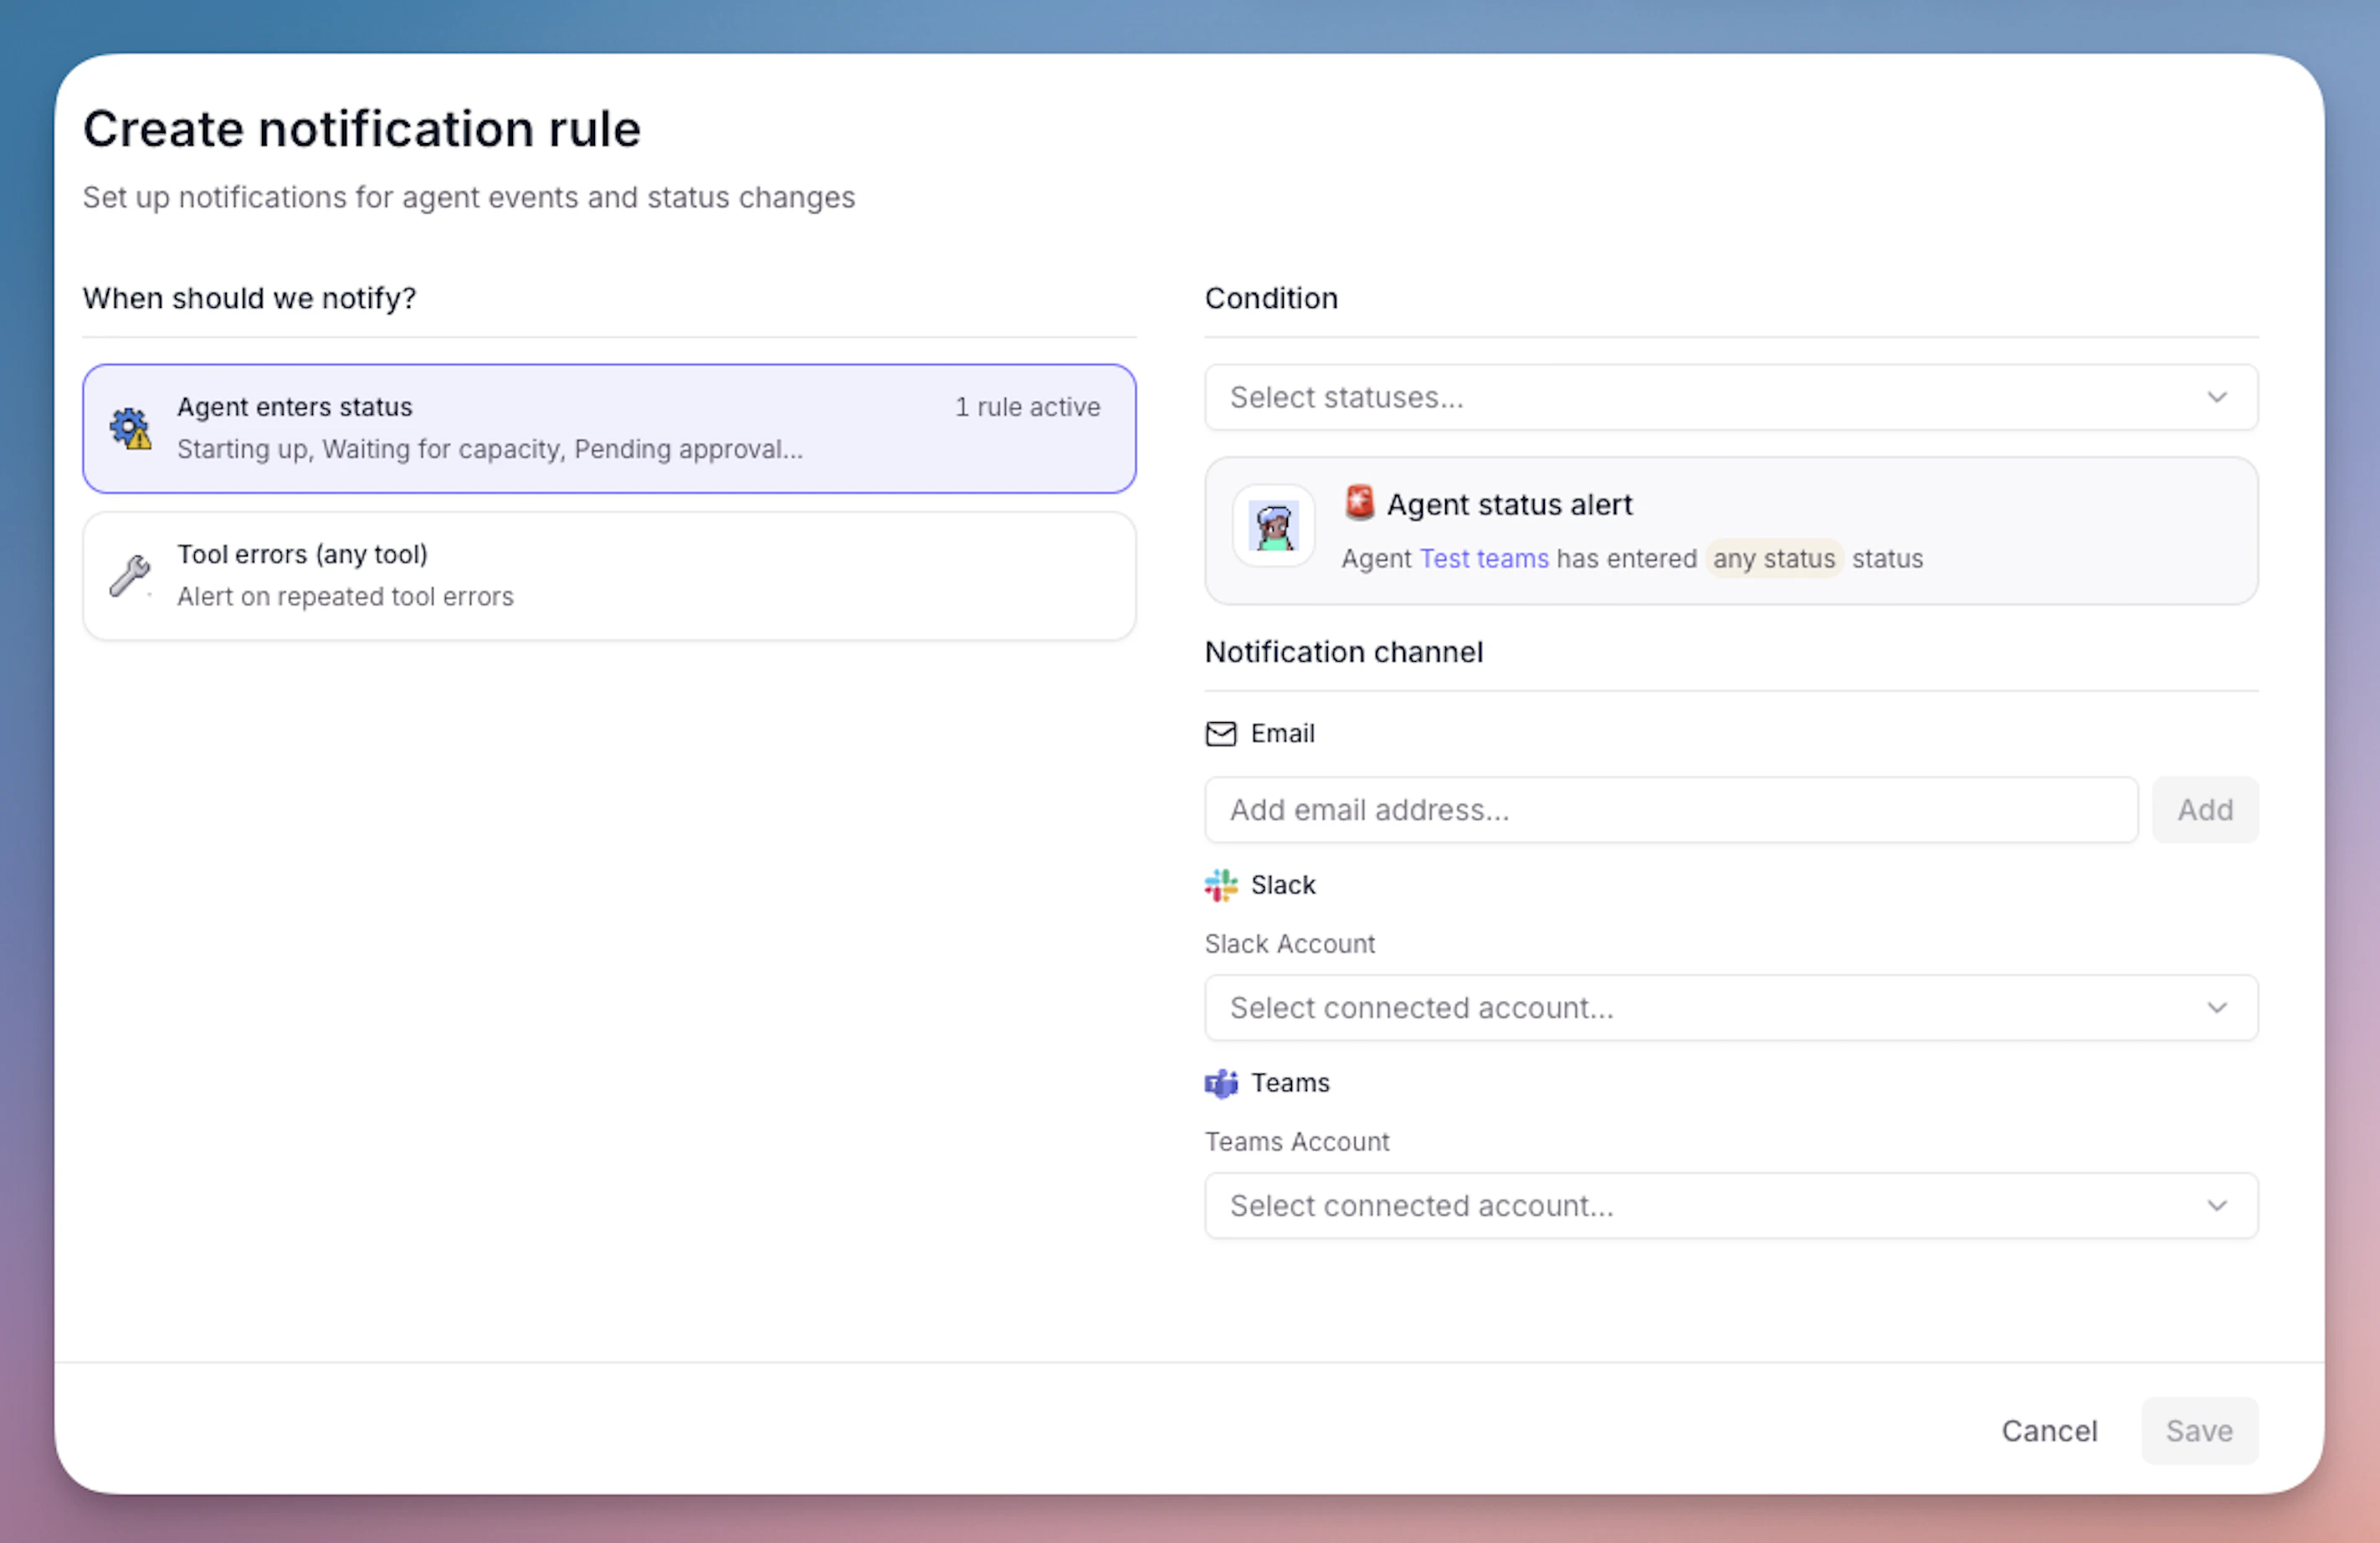
- Configure your notification settings:
- Select Microsoft Teams as the platform
- Choose the notification trigger:
- Agent enters status - Select specific task statuses (e.g., “Running”, “Completed”, “Failed”)
- Tool errors (any tool) - Get notified when any tool encounters an error
- Select a Microsoft Teams account that you have previously connected, or add a new Teams account
- Select the Teams channel where you want to receive notifications
- Click Publish changes to save your notification configuration
- Test the notification by running your agent - you should receive a notification in your selected Teams channel based on your configured triggers
What you’ll receive
When a notification is triggered, you’ll receive a message in your Teams channel with:- Agent name and status
- Task details and context
- A link to view the full task in Relevance AI
- For tool errors: information about which tool failed and why
Tool steps for Microsoft Teams
Team & channel management
List Teams
List Channels
Create Channel
List Team Members
List Teams — details
List Teams — details
- Let an agent discover which teams exist before routing a message to the right channel
- Build a dynamic team selector when automating cross-team notifications
- Audit team membership across your organization
id, displayName, description, and visibility.List Channels — details
List Channels — details
- Identify the correct channel ID before sending a message
- List available channels so an agent can present options to a user
- Check whether a channel already exists before creating a duplicate
teamId — the ID of the Team whose channels you want to list.Output: An array of channel objects, each containing id, displayName, description, and membershipType.Create Channel — details
Create Channel — details
- Automatically create project-specific channels when a new project is kicked off
- Set up dedicated support channels for high-priority customers
- Provision onboarding channels for new team members
teamId, displayName (channel name), description (optional), membershipType (standard or private).Output: The newly created channel object, including its id and webUrl.List Team Members — details
List Team Members — details
- Look up a team member’s user ID before sending them a direct message
- Check whether a specific person is already a member of a team before adding them
- Generate membership reports for compliance or auditing
teamId — the ID of the Team whose members you want to list.Output: An array of member objects, each containing id, displayName, email, and roles.Messaging & communication
Send Channel Message
Send Chat Message
Retrieve Chat Messages
Search Messages
Send Channel Message — details
Send Channel Message — details
- Send automated status updates to a project channel
- Post alerts when a monitored event occurs (e.g., a failed deployment or a new support ticket)
- Notify a team channel when a report is ready
teamId, channelId, content (message body), contentType (text or html).Output: The created message object, including its id and createdDateTime.Send Chat Message — details
Send Chat Message — details
- Send a personalized follow-up message directly to a user
- Notify a small group chat about a time-sensitive update
- Reply to a user who contacted your agent via direct message
chatId, content (message body), contentType (text or html).Output: The created message object, including its id and createdDateTime.Retrieve Chat Messages — details
Retrieve Chat Messages — details
- Read the history of a support chat before drafting a reply
- Summarize recent conversation context for a handoff between agents
- Extract action items from a group chat discussion
chatId, top (number of messages to return), skip (pagination offset).Output: An array of message objects, each containing id, from, body, createdDateTime, and lastModifiedDateTime.Search Messages — details
Search Messages — details
- Find all messages mentioning a specific project or customer name
- Locate a past decision or approval that was recorded in Teams
- Audit messages containing sensitive terms for compliance purposes
query (search keywords or phrases), top (maximum results to return).Output: An array of matching message objects with id, from, body, channelIdentity or chatInfo, and createdDateTime.Team operations
List Team Shifts
List Team Shifts — details
List Team Shifts — details
- Let an agent check the current schedule before assigning tasks to team members
- Notify on-call staff of incidents based on who is currently on shift
- Summarize the week’s schedule and post it to a team channel
teamId, startDateTime, endDateTime (date range for shifts to retrieve).Output: An array of shift objects, each containing id, userId, sharedShift (with startDateTime, endDateTime, activities), and draftShift.Advanced operations
Microsoft API Call
Microsoft API Call — details
Microsoft API Call — details
- Access Teams meeting transcripts or recordings
- Manage team membership (add or remove members)
- Retrieve files from a channel’s SharePoint document library
method (GET, POST, PATCH, DELETE), endpoint (Graph API path, e.g. /teams/{teamId}/members), body (JSON request body for write operations), params (query string parameters).Output: The raw JSON response from the Microsoft Graph API.Permissions Reference
When you connect Microsoft Teams to Relevance AI, you grant specific permissions through the Microsoft Graph API. These permissions determine what actions Relevance AI can perform on your behalf within Teams.Requested Permissions
The following Microsoft Graph API scopes are requested during the OAuth connection flow:offline_access
offline_access
Chat.Create
Chat.Create
Chat.ReadWrite
Chat.ReadWrite
ChatMessage.Read
ChatMessage.Read
ChatMessage.Send
ChatMessage.Send
ChannelMessage.Read.All
ChannelMessage.Read.All
ChannelMessage.Send
ChannelMessage.Send
Channel.ReadBasic.All
Channel.ReadBasic.All
Team.ReadBasic.All
Team.ReadBasic.All
User.Read
User.Read
User.Read.All
User.Read.All
Troubleshooting
Common admin issues and fixes
If you encounter issues connecting or using the Microsoft Teams integration, these solutions address the most common problems:"The application is not authorized" error
"The application is not authorized" error
"Consent was denied" error
"Consent was denied" error
- Work with your administrator to understand their concerns about the integration
- Provide context about how Relevance AI will use the data (see the Permissions Reference section above)
- Share Relevance AI’s Privacy Policy with your admin
- Request they reconsider and approve the consent request
Relevance AI app not visible in Teams app store
Relevance AI app not visible in Teams app store
- Go to the Teams Admin Center
- Navigate to Teams apps > Permission policies
- Allowlist the Relevance AI app or adjust the policy to allow third-party apps
Trigger is configured but agent isn't responding
Trigger is configured but agent isn't responding
-
Is the Relevance AI app installed and added to the channel or chat?
- The app must be present in the specific channel or chat where you want the trigger to work
- Install the Relevance AI app from the Teams app store
- Add it to the relevant channel or chat
-
Is the Microsoft account that authenticated a member of that channel?
- The user who connected the Microsoft integration must have access to the channel
- Verify the authenticated user is a member of the channel in Teams
-
Is the trigger active and properly configured?
- Check that the trigger is toggled to “Active” in Relevance AI
- Verify that keyword filters aren’t excluding your test messages
- Ensure you’re testing in the correct channel or chat that matches your trigger configuration
Example use cases
IT support bot
Onboarding assistant
Customer success agent
Sales pipeline assistant
Shift handoff bot
Compliance monitor
Admin consent & permissions
Enterprise organizations often require administrator approval before users can connect third-party applications or install apps in Microsoft Teams. If you see “Need admin approval” or “This app requires admin approval”, follow the steps below.- OAuth connection approval
- Teams app installation approval
- Copy the consent URL that appears in the Microsoft login window.
- Forward the URL to your Microsoft 365 admin with a request to grant consent, including what Relevance AI is and how it will be used.
- Your administrator will open the URL, review the requested permissions, and grant consent on behalf of the organization.
- Return to Relevance AI and retry the Microsoft integration connection.
Best practices
Use List Teams and List Channels to resolve IDs dynamically
Use List Teams and List Channels to resolve IDs dynamically
Start message-sending tools in approval mode
Start message-sending tools in approval mode
Retrieve chat messages before responding
Retrieve chat messages before responding
Use Search Messages for context retrieval, not real-time monitoring
Use Search Messages for context retrieval, not real-time monitoring
Handle rate limits gracefully
Handle rate limits gracefully
429 Too Many Requests responses by waiting before retrying. Avoid polling patterns that make repeated API calls in quick succession.Troubleshooting
Tool step returns an authorization error
Tool step returns an authorization error
List Teams returns an empty array
List Teams returns an empty array
Send Channel Message fails with a 403 error
Send Channel Message fails with a 403 error
Search Messages returns no results for a known message
Search Messages returns no results for a known message
Retrieve Chat Messages returns messages out of order
Retrieve Chat Messages returns messages out of order
createdDateTime. If you need the most recent messages first, sort the output by createdDateTime in descending order within your tool configuration.Frequently asked questions (FAQs)
What is the Teams Bot App?
What is the Teams Bot App?
Where can I use the bot?
Where can I use the bot?
- Channels — add the app to a channel and your agent can monitor and respond to messages there
- Group chats — add the app to a group chat for your agent to participate in group conversations
- Direct messages (DMs) — users can open a 1:1 conversation with the Relevance AI bot and interact with your agent privately
How do I start a direct message conversation with the bot?
How do I start a direct message conversation with the bot?
- In the Teams search bar, type Relevance AI
- Under People, select the Relevance AI bot
- Send any message to open the conversation
Who supports the Microsoft Teams integration?
Who supports the Microsoft Teams integration?
What is Microsoft Teams and why should I use it with Relevance AI?
What is Microsoft Teams and why should I use it with Relevance AI?
Do I need a Microsoft Teams account to use this integration?
Do I need a Microsoft Teams account to use this integration?
What's the difference between connecting my Microsoft account and installing the Teams app?
What's the difference between connecting my Microsoft account and installing the Teams app?
- OAuth connection (in Relevance AI): Authenticates your Microsoft account and grants Relevance AI permission to access Microsoft services
- App installation (in Microsoft Teams): Installs the Relevance AI app so it can interact with channels and chats
Why don't I see my Teams channel in the dropdown when setting up a trigger?
Why don't I see my Teams channel in the dropdown when setting up a trigger?
- App not installed: The Relevance AI app must be installed in Teams and added to the specific channel
- User not a member: The Microsoft account you connected must be a member of the channel
- Permissions issue: You may not have sufficient permissions to access the channel
- Admin approval needed: Your organization may require admin consent
Can I connect multiple Microsoft accounts?
Can I connect multiple Microsoft accounts?
What permissions does the Microsoft Teams integration require?
What permissions does the Microsoft Teams integration require?
Why don't I see all my Teams channels when setting up a trigger?
Why don't I see all my Teams channels when setting up a trigger?
- Have the user join the channel in Microsoft Teams
- Return to Relevance AI and refresh the trigger setup page
- The channel should now appear in the dropdown list
I set up a trigger but my agent isn't responding. What's wrong?
I set up a trigger but my agent isn't responding. What's wrong?
- Install the Relevance AI app from the Microsoft Teams app store
- Add the app to the specific channel or chat where you want the trigger to work
- Test by sending a message that matches your trigger conditions
Do triggers work for direct messages?
Do triggers work for direct messages?
Can I filter which messages trigger my agent?
Can I filter which messages trigger my agent?
How do I prevent my agent from sending messages automatically?
How do I prevent my agent from sending messages automatically?
Can my agent access files shared in Teams?
Can my agent access files shared in Teams?
What's the difference between the pre-built Teams tool steps and the Microsoft API Call tool step?
What's the difference between the pre-built Teams tool steps and the Microsoft API Call tool step?
My agent's tools are returning a 401 Unauthorized error. How do I fix this?
My agent's tools are returning a 401 Unauthorized error. How do I fix this?
Are there rate limits for Microsoft Teams API calls?
Are there rate limits for Microsoft Teams API calls?
429 Too Many Requests status code when limits are exceeded.Can I use this integration with Microsoft Teams for personal use?
Can I use this integration with Microsoft Teams for personal use?
How do I remove the Microsoft Teams integration?
How do I remove the Microsoft Teams integration?
- Go to the Integrations & API Keys page from the sidebar
- Search for Microsoft (Teams, Outlook, SharePoint, OneDrive) from the list
- Click ”…” on the account you want to remove
- Click “Remove” and confirm your choice